A survey’s design is more than a cosmetic choice. It is a trust signal, a brand reinforcement tool and often the first impression your audience gets of your organization. In SurveyMonkey, the Theme and Branding features allow you to create surveys that feel uniquely yours. This step-by-step guide will walk you through the process, with practical tips to ensure your surveys look professional, cohesive, and on-brand.
Branding your surveys is not just about aesthetics. According to SurveyMonkey’s own research, consistent branding can improve response rates because it reassures participants that the survey is legitimate and worth their time. At My Survey Help, we’ve seen how a well-branded survey can elevate data collection and leave a lasting impression on respondents.
Why Branding in SurveyMonkey Matters
Think of your survey as a miniature version of your website or product. It’s part of your brand ecosystem. If it looks generic or mismatched, it can create doubt in a respondent’s mind. If it feels consistent with your brand identity, it builds credibility and helps respondents feel comfortable sharing honest feedback.
Good branding also:
Signals professionalism and attention to detail.
Encourages higher completion rates.
Makes your surveys instantly recognizable, even when shared externally.
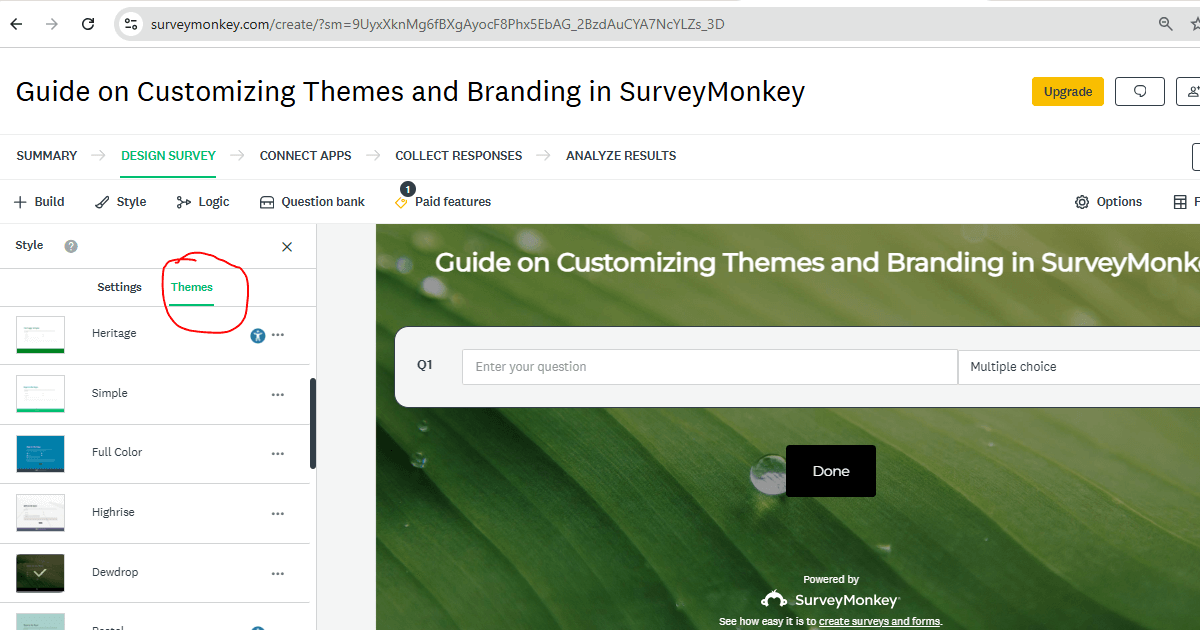
Step 1: Select a Starting Theme
Every customization in SurveyMonkey begins with selecting a base theme. Once you log in and open your survey, go to the Design Survey tab. From there, click Themes to explore the available designs.
If you find one that matches your brand’s style, you can use it as-is or tweak it. But even if you start with a basic, neutral theme, SurveyMonkey’s customization tools let you transform it into something uniquely yours.
Step 2: Customize Colors for Brand Recognition
Color is one of the most powerful brand identifiers. In SurveyMonkey’s Customize Theme panel, you can modify background colors, question text, and button styles.
If you know your brand’s hex color codes, enter them directly for accuracy. For example, if your brand’s primary color is a deep blue (#002B5C), applying that to the survey background or buttons can create instant recognition.
WebAIM’s contrast checker is a useful tool here. Make sure your chosen text and background colors meet accessibility standards. This ensures your survey is visually appealing and inclusive.
Step 3: Add Your Logo for Instant Brand Identity
Adding a logo is one of the simplest yet most impactful ways to brand your survey. In the Design Survey tab, look for the Add Logo option at the top. Upload a high-resolution version of your logo (JPG, PNG, or GIF, max 2MB).
Once added, you can adjust its placement (top left, top center) and scale. Keep it clear but not overwhelming — your logo should frame the content, not compete with it.
Step 4: Select Fonts That Reflect Your Brand
Fonts affect readability and tone. Under Customize Theme, you can choose from several font styles for your questions and answers. Select one that’s easy to read and consistent with your brand’s existing materials.
For example:
A sans-serif font like Arial or Helvetica works well for modern, minimal brands.
A serif font like Georgia may suit traditional, academic, or formal organizations.
Consistency matters. As such, if your website uses a certain font style, try to match it in SurveyMonkey for a seamless look.
Step 5: Use Custom Backgrounds (Optional)
If you want a more personalized touch, SurveyMonkey allows background images for certain themes. This can be effective if done subtly. For example, a faint texture, a blurred office photo, or a branded pattern.
Avoid busy or high-contrast images that make text hard to read. And always test on multiple devices to make sure the background works well at different screen sizes.
Step 6: Preview and Test on All Devices
SurveyMonkey’s Preview & Score feature lets you see exactly how your survey will appear on desktop, tablet, and mobile. This is crucial, because a theme that looks perfect on a large monitor may feel cramped on a phone.
As part of your testing:
Check that colors and logos display correctly.
Ensure all text is legible.
Verify that the layout is consistent across devices.
Advanced Branding Features (For Paid Plans)
If you’re on a paid SurveyMonkey plan, you’ll unlock more advanced branding features like:
Custom CSS for deeper design control.
White-label surveys that remove SurveyMonkey branding.
Custom survey URLs for an even more professional appearance.
These features are especially valuable for organizations running high-stakes or public-facing surveys.
Common Branding Mistakes to Avoid
Even with all these customization options, it’s possible to overdo it. Watch out for:
Too many colors — stick to 2–3 core brand colors.
Distracting backgrounds that reduce readability.
Oversized logos that push important content down the page.
Final Thoughts
Customizing your SurveyMonkey themes and branding is about more than just “making it pretty.” It’s about creating a trustworthy, professional environment where respondents feel confident providing their feedback.
The steps above will help you create a survey that reflects your brand’s personality while staying functional and accessible. And if you want expert help, My Survey Help specializes in designing on-brand surveys that are not only beautiful but optimized for high response rates.