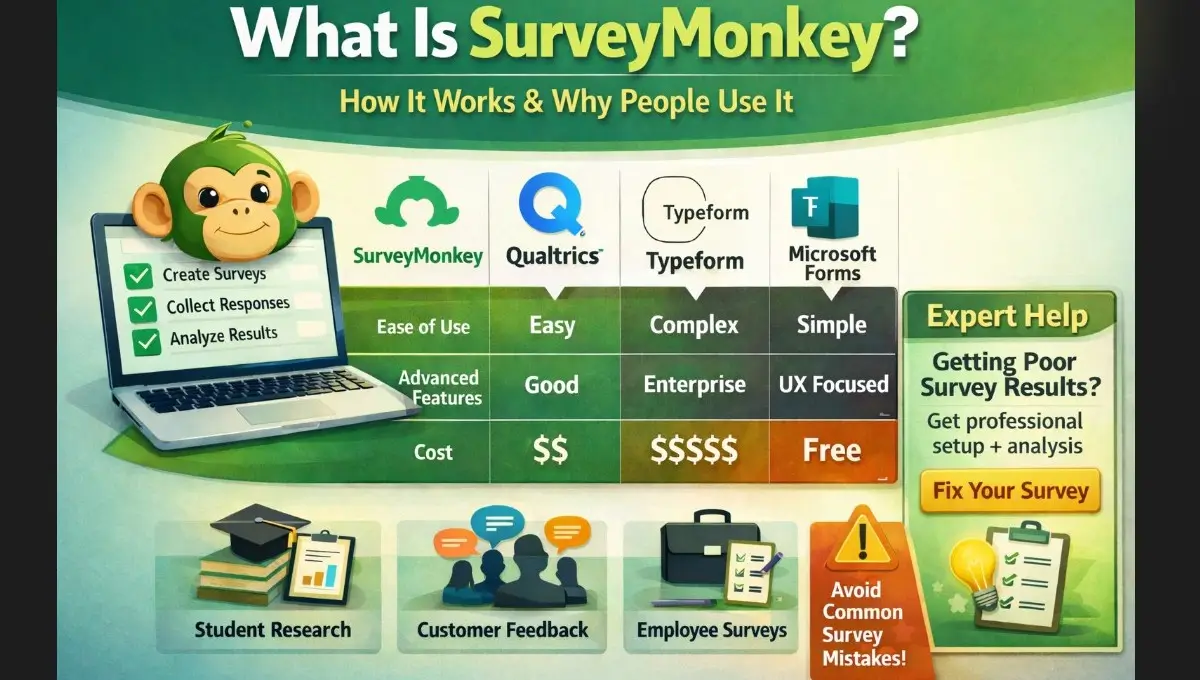
SurveyMonkey is a web-based tool that allows users to create surveys, distribute them online, and analyze responses through built-in dashboards and exports.
It removes the need for programming skills by offering templates, pre-built question types, and automated reports. Users can move from idea to data collection quickly, but the quality of results depends heavily on how the survey is designed.
Students, researchers, businesses, and organizations use SurveyMonkey to collect structured data for decision-making, academic work, and feedback analysis.
What Is SurveyMonkey Used For?
SurveyMonkey supports a wide range of applications depending on the user’s goal.
Academic users rely on it for dissertation questionnaires, Likert scale studies, and structured research surveys. Businesses use it for customer feedback, product validation, and market research. HR teams run employee engagement and training evaluations, while nonprofits use it for impact assessments and donor feedback.
For example, a student collecting dissertation data may use structured scales and export results for statistical testing, while a company may run a satisfaction survey to improve customer experience. In both cases, the tool is the same, but the design approach determines whether the data becomes useful.
How SurveyMonkey Works (Step-by-Step)
SurveyMonkey follows a structured workflow from creation to analysis.
- Create an account and select a plan
- Choose a template or start from scratch
- Add questions such as multiple choice, Likert scales, and matrix grids
- Apply logic such as skip rules and branching
- Preview and test the survey
- Distribute via link, email, embed, or QR code
- Collect responses in real time
- Analyze results or export to Excel or SPSS
For users struggling with survey setup, applying logic correctly is often the most challenging step. Proper branching and flow can be explored in the detailed guide on SurveyMonkey logic and branching.
Key Features of SurveyMonkey
SurveyMonkey remains popular because it balances ease of use with structured survey design capabilities.
It offers a wide range of question types including multiple choice, ranking, matrix questions, text responses, and Net Promoter Score formats. Templates help users avoid common design mistakes, especially in research and feedback scenarios.
Logic features such as skip logic and branching improve respondent experience and reduce irrelevant questions. These features are critical in longer surveys where flow directly affects completion rates.
Distribution options include web links, email collectors, embedded forms, and integrations with external platforms. Once responses are collected, built-in analytics generate charts and summaries instantly.
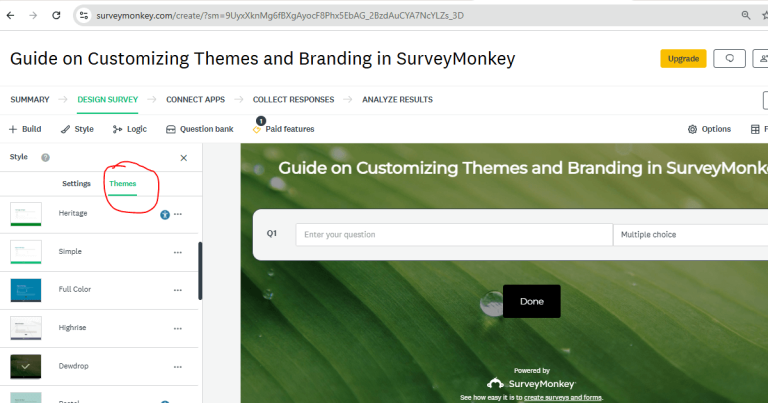
For more advanced workflows, scoring systems can be configured using SurveyMonkey scoring, while branding and customization can be handled through custom themes and design settings.
Real Examples of SurveyMonkey Use
Understanding how SurveyMonkey is used in practice helps clarify its value.
A university student may design a questionnaire with Likert scale questions to measure attitudes and behaviors, then export the dataset for statistical testing. In this case, question structure and scale consistency directly affect analysis quality.
A business may run a customer satisfaction survey to identify service gaps. Here, question clarity and response options determine whether insights are actionable.
An HR team may use SurveyMonkey for employee engagement surveys, where anonymity and structured feedback play a critical role. A full example of this can be seen in structured employee feedback workflows like employee satisfaction surveys.
Benefits of Using SurveyMonkey
SurveyMonkey reduces technical barriers in survey design. Its interface allows users to build surveys quickly without coding, making it accessible for beginners.
The platform supports both small and large projects. Individuals can run quick surveys, while organizations can manage structured research and feedback systems.
Built-in analytics provide immediate summaries, which helps users interpret results without external tools. Mobile responsiveness improves completion rates, ensuring surveys perform well across devices.
Export compatibility with Excel and statistical tools makes it suitable for academic and professional analysis.
Limitations of SurveyMonkey
Despite its strengths, SurveyMonkey has limitations that users should understand before relying on it fully.
The free plan restricts the number of questions and visible responses, which can limit meaningful analysis. Advanced logic and export features require paid plans, which many users discover only after building their surveys.
Customization is limited in lower tiers, especially for branding and design control. In addition, poorly structured surveys often lead to unusable data, even when the platform itself works correctly.
For a detailed breakdown of plan restrictions, the guides on free SurveyMonkey features and SurveyMonkey pricing explain where limitations begin to affect real projects.
Pros and Cons of SurveyMonkey
SurveyMonkey offers clear advantages but also comes with trade-offs.
Pros include ease of use, strong templates, structured question types, and reliable data export options. It works well for both beginners and structured research projects.
Cons include limitations in the free plan, restricted access to advanced features, and the risk of poor data quality if surveys are not designed correctly. Many users underestimate how much survey design affects final results.
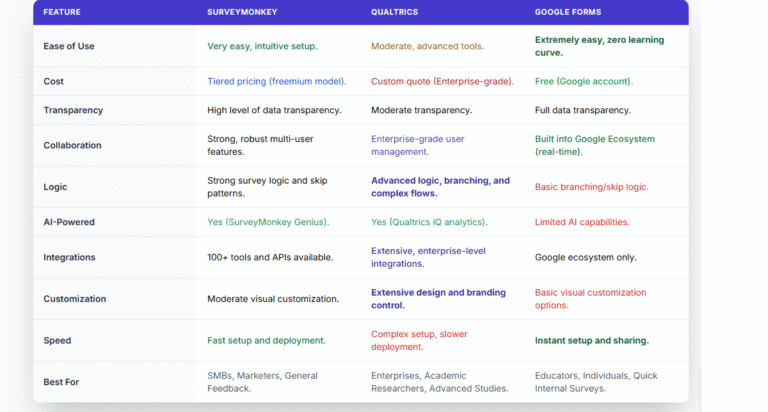
SurveyMonkey vs Other Survey Tools
SurveyMonkey sits between beginner-friendly tools and enterprise research platforms. The main difference across tools comes down to complexity, design experience, and analytical depth.
| Feature | SurveyMonkey | Qualtrics | Typeform | Microsoft Forms |
|---|---|---|---|---|
| Ease of use | Easy to use with structured interface | Complex, requires training | Very easy, conversational design | Very easy, minimal setup |
| Best for | Students, researchers, businesses | Enterprise research and experience management | Marketing, engagement, short surveys | Basic forms, quizzes, internal use |
| Survey design | Structured, template-based | Highly customizable, advanced workflows | Conversational, one-question-at-a-time | Basic form builder |
| Logic & branching | Advanced (paid plans) | Very advanced, enterprise-level | Moderate logic flows | Limited logic capabilities |
| Question types | Wide range (Likert, matrix, ranking) | Extensive and highly customizable | Moderate, focused on UX | Limited question types |
| Analytics | Built-in dashboards + export to SPSS | Advanced analytics, dashboards, XM | Basic analytics, UX-focused insights | Basic charts and summaries |
| Customization | Moderate (better on paid plans) | High customization and control | Strong visual customization | Very limited customization |
| Integrations | 200+ integrations | Enterprise integrations | Marketing-focused integrations | Microsoft 365 ecosystem |
| Pricing | Free + paid tiers | Expensive, enterprise pricing | Mid-range pricing | Mostly free with Microsoft 365 |
| Ideal use case | Academic research, structured surveys | Large-scale research programs | Lead generation, user experience surveys | Quick polls and internal data collection |
For users comparing platforms, detailed comparisons such as SurveyMonkey vs Qualtrics and broader tool comparisons like SurveyMonkey vs Qualtrics vs Google Forms help clarify which tool fits specific needs.
Why Many SurveyMonkey Surveys Fail
Most problems do not come from the platform itself but from how surveys are designed.
Common issues include poorly written questions, unbalanced scales, incorrect logic flow, and lack of planning for data analysis. These problems lead to unreliable data, making statistical analysis difficult or invalid.
Users often realize these issues too late, after data has already been collected.
For projects that require accurate results, structured survey design and proper data preparation are critical. Services such as SurveyMonkey setup and design support help ensure surveys are built correctly from the start. When data has already been collected, questionnaire data analysis support helps transform raw responses into meaningful results.
Helpful Resources
The following guides provide deeper insights into specific SurveyMonkey functions and integrations:
- How to create a SurveyMonkey survey
- SurveyMonkey collaboration features
- SurveyMonkey Airtable integration
- Mailchimp SurveyMonkey integration
- Salesforce SurveyMonkey integration
Final Thoughts
SurveyMonkey is a structured and accessible survey platform that supports questionnaire design, data collection, and analysis. It works well for academic, business, and organizational use when surveys are designed properly.
The biggest challenge is not using the tool, but creating surveys that produce reliable and analyzable data. When structure, logic, and analysis are handled correctly, SurveyMonkey becomes a powerful tool rather than a source of confusion.
Frequently Asked Questions About SurveyMonkey
What is SurveyMonkey mainly used for?
SurveyMonkey is used for research surveys, customer feedback, employee engagement studies, and academic questionnaires.
How does SurveyMonkey work?
It allows users to create surveys, share them online, collect responses, and analyze results through dashboards or exports.
Is SurveyMonkey suitable for students?
Yes, especially for structured surveys and dissertation data collection, provided the survey is designed correctly.
Can SurveyMonkey data be analyzed in SPSS?
Yes, data can be exported and analyzed using statistical tools such as SPSS.
Is SurveyMonkey free?
It offers a free plan with limitations. Advanced features require paid plans.